 |
| Yum. |
A year or so ago, I remember adding puréed pumpkin to some chili I had made and ended up really liking it. Unfortunately, I don't believe I documented anywhere what I did to make that dish! So today, the idea came to mind again and I decided to document the whole process so I could repeat it in the future! And since Mark has been working ALL DAY, I have some time on my hands.
This recipe is based on ingredients I had on hand:
 |
| 20 oz ground
turkey breast (super lean), 3 peppers, 1 onion (not pictured), 1 can of
organic pumpkin, 1 large can of diced tomatoes, spanish olives, sofrito
(blend of cilantro, garlic, and peppers), sazon packet, chili powder,
red pepper flakes, ground cumin, cumin seeds, oregano, salt and pepper. |
Step 1: Roughly dice all fresh veggies and set aside
 |
| 3 different colored peppers and 1 small onion |
Step 2: Brown ground turkey and season with all spices
Since the ground turkey breast is so lean, you will need to spray a good amount of cooking spray in your sauce pan to prevent sticking
 |
| I don't really measure out my seasonings, so use your judgment. I would be careful with the cumin seeds (just a pinch) since that gives A TON of flavor. Also, I added a couple shakes of the crushed red pepper. Feel free to add more if you like it really spicy. Otherwise, everything else I just sprinkled on until I felt like it was enough. |
Step 3: Add the whole can of diced tomatoes and all veggies.
Add salt and pepper to the veggies before mixing in with the ground turkey.
Cover and let simmer for about 5 minutes.
 |
| I love colorful meals. They excite me. |
Step 4: Add the whole can of pumpkin.
Stir thoroughly, cover, and let simmer on medium-low for 15-20 minutes.
 |
| pumpkin adds good carbs, fiber, vitamin a, and tons of other good for you stuff! |
Step 5: Do a final mix and taste test.
Add more spice or salt/pepper if needed.
Mine came out perfect and didn't need anything else ;)
 |
| steamy goodness! |
Step 6: Eat up!
I decided to serve my chili with an ounce of ripe avocado, and 1/4 ounce of shredded cheese.
Because I used ground turkey BREAST, this meal was seriously low in calories and fat, but high in protein! Adding the avocado really helped keep me full since it added the necessary good fat to my meal (and amazing creamy flavor!). The whole recipe makes about 8 servings of about 1 1/4 cup each.
According to my recipe app, here are the nutritional stats for 1 1/4 cup WITHOUT the avocado and cheese:
136 calories | 0.6 g fat | 11.9 g carbs | 2.7 g fiber | 19.5 g protein |
All stats are estimates
Since I had plenty of calories left for the day, AND I did some strength training today, I went for 2 servings with dinner.
All in all, not because I made it, but this dish is really delicious. The pumpkin flavor is very light and it has just enough spice to complement the slight sweetness of the pumpkin. You should try it and let me know of any wonderful variations!
XOXO,
SMP
 |
| This is so me and Mark! When it comes to ice-cream, he doesn't understand portion control! Love you babe! |
There is something about having an after dinner treat that just resonates with so many people. Mark LOVES his ice cream so the temptation is always in the house.
For a couple of months now I've been researching how to make healthy ice cream alternatives at home and I believe I have finally perfected my recipe! AND, it's so stinkin' easy too.
What you will need:
1/2 frozen very ripe banana*
1/2 cup to 1 cup of frozen pineapple chunks (no sugar added, just straight up fruit)
Drizzle of honey
A really good blender, food processor or ninja blender like I have.
*when your banana turn too ripe to eat, peel the banana, cut in half, stick in freezer bag and freeze so you always have some frozen bananas on hand! They work best in this recipe when they are really frozen so make sure to freeze for at least a few hours before attempting.
Step 1: Add frozen banana and frozen pineapple to blender/processor
Step 2: Start processing slowly until small chunks form. With a spoon, scrape down sides and continue pulsing away.
 |
| Trust me, this will turn into something wonderful, despite how it looks now. |
Step 3: Keep pulsing until all of a sudden it turns into a creamy, ice-cream like substance! It could take a while but don't give up!
 |
| Only two ingredients: frozen banana and frozen pineapple! |
Step 4: Serve in a pretty glass and drizzle some honey!
 |
| Now, ain't that the cutest thang! |
This is really delicious and satisfies my sweet tooth! It also works amazingly well with frozen mangoes! I've tried with frozen strawberries, and while the taste is good, the consistency is not as creamy as with the pineapples or mangoes. Don't know why! But I'm sure any combination would be wonderful!
Do you have any guilt free dessert recipes up your sleeves?
Grilled Eggs in Red Pepper Halves
This morning I was feeling a little creative and I just LOVE using our grill. To me, it makes every meal just a little more enjoyable. So this breakfast (or lunch or whenever meal) is really easy, but definitely a bit tricky. After posting this picture on facebook, I got a number of comments of friends wanting to try it and a few private messages on the recipe. I definitely think this recipe is a work in progress, since it was my first time attempting to make this.
Turn on grill - medium heat
Step 1: Wash, cut off top, and remove seeds from a red pepper. Now I decided to cut my red pepper lengthwise, because I wanted to be able to use both sides of the pepper. HOWEVER, it would probably hold the egg a lot easier if you cut it in half, the other way. As long as the bottom was perfect and would stand on it's own on the grill. Then I guess you could figure out something to do with the other half that doesn't have a bottom.
Step 2: As you can see in the picture, I kept the top of the pepper I had cut off (minus the stem) and actually used it to lean my two pepper halves on while I cracked one egg into each. (This part of it is not pictured since I had moved them to photograph them). Leaning them on the top will help to keep the egg from spilling out all over your grill. Sprinkle with some salt, pepper, and ground cumin. Close the grill lid.
NOTE: Now, I didn't know how long it would take the egg to set so I kept checking it very often. Turns out it takes a little while -- and it was probably taking a lot longer because I kept opening the lid!
After about 10 minutes, it still really wasn't setting so I decided to cover it loosely with a piece of aluminum foil. This really did the trick. I would recommend doing that from the beginning!
Step 3: Once the egg is mostly done, I added a tiny sprinkle of shredded cheese and recovered with the aluminum foil. Once it was bubbly, I removed the egg peppers from the grill.
Since, the egg peppers were on the grill for about 20 minutes, my red peppers got pretty charred. Had I covered with the aluminum from the beginning and left the lid closed for most of the time, the egg probably would have set much faster and my pepper wouldn't have been so charred. However -- the pepper tasted AMAZING! So sweet and developed just an amazing flavor. CON: While you can easily peel off the black skin off the pepper -- it was a little difficult with your lovely egg inside. Plus it was a little bit of work to do before being able to enjoy your meal! Again, I will cover loosely with aluminum foil from the beginning to create a pocket of heat around the egg which will hopefully cause the whole thing to cook much faster.
I didn't try this, but I think it would be delicious with some salsa or guacamole on top or maybe even both! Or maybe adding some chopped turkey breakfast sausage or crumbled bacon before adding the cheese. Yummmy. I will definitely have to try again soon!
IN OTHER NEWS:
Despite the fact that I didn't make it to the gym ALL week and I was in MA Tuesday - Friday, I still lost 0.2 pounds! I know it's not a lot but I usually come back from work travel with a few extra pounds. I'm proud of myself for practicing self control and I'm grateful for my in-laws who are very supportive of my eating habits!
Here are a few meal highlights from before heading up to Boston:
 |
| Mixed greens, avocado, diced chicken breast, strawberries, pineapples, blueberries, green, red, and yellow diced peppers. Served with the homemade dressing below! |
 |
| This is so easy and you know it's not filled with extra crap you can't even pronounce! 1 tbsp each of stoneground dijon mustard, organic honey, olive oil and white wine vinegar = delicious honey mustard dressing. I only needed 1 tbsp for my huge salad above. Very tasty. |
 |
| We LOVE guacamole in this house. And my recipe is kinda the bomb. Why ruin a healthy treat with salty, oily chips? Keep the crunch and scoop it up with yellow and red peppers. |
 |
| Mark kept his pasta, but I substituted with cauliflower "rice" to go with the turkey sausage and broccoli. |
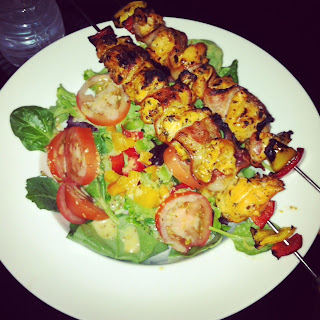 |
| Simple salad with my honey mustard dressing + bacon wrapped chicken kabobs. Try it. |
|
While I was in MA, Momma Pops and I made a healthy and delicious meal together:
 |
| Lemon chicken with Broccoli - WW Recipe - 4 points a serving |
 |
| Roasted cauliflower and roasted tomatoes. Amazing. I think roasting cauliflower is my favorite way to have it. It was so good, this was all that was left by the time dinner was ready! |
|
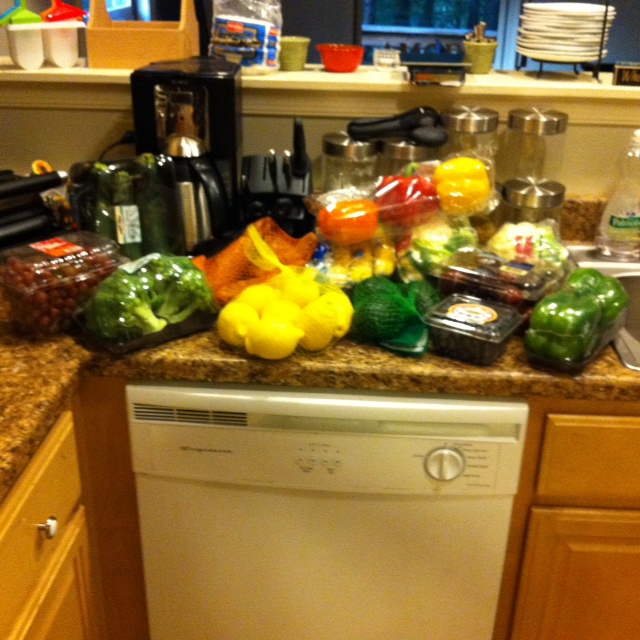
Once I got back into PA last night, I went STRAIGHT to the grocery store to stock up on veggies and fruits. In order to stay on track, I have to have lots of healthy options at my finger tips. Luckily, the nearby Aldi's has a great produce section with ridiculously good prices:
 |
| Some highlights: those 2 lbs of red, seedless grapes = $1.78; pint of blueberries = $1.99; bananas at .35 cents a pound; 2 lbs of red plums = $2.39; crazy, right?! |
|
|
And I just want to add how much I LOVE red plums:
 |
| and, you can have like 3 for under 100 calories! |
Alright, that's all I have for you today!
Happy Father's Day to all of the fathers out there! But most importantly
to MY amazing father! His love and faith is inspiring; truly a man of integrity; a man of God.
 |
| LOVE YOU PAPI!!!! |






.JPG)
.jpeg)






 Posts
Posts

